WordPress is a popular platform for blogging. But it’s actually a Content Management System (CMS), and you can create not only functional and appealing blogs with it but also different websites including e-commerce sites. Many people today prefer WordPress for the various options it provides and the ease of use.
Though there are a lot of default options to create your website or blog, these are still not sufficient. �Post type’ is one of the elements that are hard to customize with the default options in WordPress. Post types are the predefined templates where you can create the pages and posts of the site. When you navigate to Posts > Add New in WordPress, you will get an interface to write a blog post. But what if you want to write a testimonial or product description? Which template will you use? This is where you can use �custom post types’.
For example, for a product description page, you can add fields like prices, product images, etc. You can add custom fields to your page using �custom post type’. This option can be used as a bloggers outreach tool. Different type of content can actually increase traffic to your site and generate more revenue.
Benefits of custom post types
The �post’ and �page’ options of WordPress have some restrictions. The �post’ is used for blog posts, news updates, etc. The �page’ is used for �About’, �Contact Us’ or similar static page. But what if you need to represent your content in some other way? The �custom post type’ will give
you more options. You will be able to create reviews, user profiles, events, testimonials, property listings, etc. that you cannot do with the default options of WordPress.
There are various advantages of using the custom post type in WordPress. First of all, it can tailor your post type according to your needs and preferences. Secondly, using this option, you will be able to organize your pages much easier without the need to alter the page hierarchy. Overall, you can turn the blogging platform into a Content Management System (CMS) using the �custom post type’.
How to create custom post types
You can create custom post types in two ways: using plugins or manually. It is much simpler to use plugins; however, it actually depends on your needs.
Creating posts using a plugin
You need first to choose a dedicated plugin. Here are some popular plugins that you can choose:
- Custom Post Type UI
With this plugin, you can register taxonomies and custom post types. The interface is very simple, and no coding experience is required. You can add new post types and to RSS feeds and navigation menus as well.
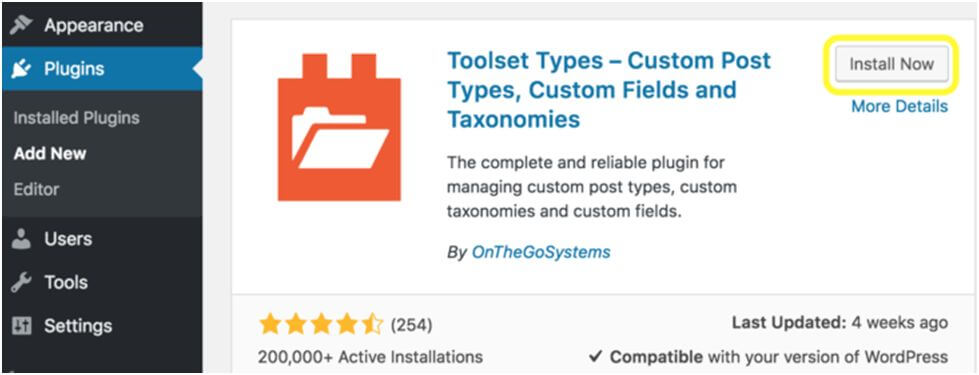
- Toolset Types
This plugin will let you customize your website’s content according to your needs. It will also guide you on how to create custom posts. You need to know a little about PHP in order to use this plugin.
- Custom Post Type Maker
It is a very user-friendly plugin. The interface is simple. You can easily manage your icons for custom post types. Unlike other plugins, this one is absolutely free.
After choosing the plugin, you should install it and configure the custom post type. For example, you have chosen the Toolset Types plugin. You first need to go to Plugins > Add New in the WordPress dashboard. Then look out for Toolset Types and install it. Activate the plugin, and you will see the Toolset tab in the dashboard. Then you go to Toolset > Post Types and choose Add New. Once you click �Add New’, the Edit Post Type page will open, and here you can enter the post type’s name, choose an icon and configure it.
You can use the Options menu to assign different attributes to your post. You can use Post Relationships to form connections between your posts. After you have confirmed your custom post type, you can publish it. You should save your post using Save Post Type. If you want to add new fields to your custom post type, then go to Toolset > Dashboard and select the appropriate options.
Creating a custom post type manually
In order to create the custom post types manually, some coding knowledge is required. Here are the steps you should follow:
- Suppose you want to create a News Stream for your site. You should first register the Post Type. On your WordPress backend, go to Appearance > Editor. Then go to Theme Files and choose functions.php. You should copy and paste the following code:
- // Creates News Custom Post Type
- function news_init() {
- $args = array(
- ‘label’ => ‘News’,
- ‘public’ => true,
- ‘show_ui’ => true,
- ‘capability_type’ => ‘post’,
- ‘hierarchical’ => false,
- ‘rewrite’ => array(‘slug’ => ‘news’),
- ‘query_var’ => true,
- ‘menu_icon’ => ‘dashicons-video-alt’,
- ‘supports’ => array(
- ‘title’,
- ‘editor’,
- ‘excerpt’,
- ‘trackbacks’,
- ‘custom-fields’,
- ‘comments’,
- ‘revisions’,
- ‘thumbnail’,
- ‘author’,
- ‘page-attributes’,)
- );
- register_post_type( ‘news’, $args );
- }
- add_action( ‘init’, ‘news_init’ );
After you have added the code to functions.php, you will find custom post type on the WordPress backend. If you want to add review instead of news, just replace any instance of �news’ with �reviews’.
- You should now test the code. Go to the custom post type and select Add New. You will see the Editor where you can type your posts and publish to see how they look.
- You will now need to create a custom post type template. For this, you need to add a new file to the theme folder. You can use File Transfer Protocol (FTP) for this. Go to Appearance > Editor and find the theme located in file stylesheet.css under Theme Name. Then find the file header.php and add the following code:
- <?php touch(‘wp-content/themes/theme-name/new-file.php’); ?>
Replace the theme name with your preferred file name. Then click on Update File. Go to the Home page and go to Appearance>Editor > header.php. You will now notice your new file. Then go back to the header.php file and delete the code you had written and click on the Update File. Go to your file and add the following code:
- <?php
- /*Template Name: News*/
- get_header();
- query_posts(array(
- ‘post_type’ => ‘news’
- )); ?>
- <?php
- while (have_posts()) : the_post(); ?>
- <h2><a href=”<?php the_permalink() ?>”><?php the_title(); ?></a></h2>
- <p><?php the_excerpt(); ?></p>
- <?php endwhile;
- get_footer();
- ?>
Update the file. Then go to Posts > Add New. Give a name to the post. Choose the template from the Page Attributes menu and select the new template. Then click on Publish. You will now see the test pages that you had created.
- After you have created your post, you want the users to read your post. So, you need to add it to the site’s navigation menu. For this you need to go to Appearance > Menus, then find your custom post type and choose to Add to Menu. Save it. Before publishing your post, you should conduct an SEO audit to make sure that your post ranks high in search engine pages.
- You need to create an archive page so that the website users know what the post is about before they click on it to read in detail. However, it is an optional step, and you can read further about it here.
So, now you know how to create custom post types manually. Just follow these steps, and you will be able to publish your new content on your site conveniently.
People always look for diverse content. The custom post types let you create such content and share with the users. Use plugins to create the custom post types or do it manually. If you are in a hurry and don’t want to go through the hassle of adding codes, then you should choose the
plugins. Enjoy creating unique contents with this interesting feature of WordPress.
She is a blogger who loves to write in different verticals. She co-authored Supercharge Organic Traffic: A popular course focusing on Organic Traffic for Ecommerce.. Her hobbies are traveling and reading.