Apple released the newest macOS 11 Big Sur on the 12th, November 2024. The leap from macOS 10 series to macOS 11 and the obvious design change are very refreshing. Set aside all the improvements, macOS Big Sur still doesn’t support NTFS writing ability by default. Yes, again. When macOS 10.15 was released last year, the long-waiting NTFS write support wasn’t added either. It is really a disappointment.
In this article, we will introduce an NTFS for Mac tool by iBoysoft to help you write to Windows NTFS-formatted disks on macOS 11 freely as NTFS write support natively exists.
Who will need NTFS for Mac software? Should you?
As Windows still dominates the computer operating system market, many external hard drives come initially with Windows NTFS file system, or many people format their drives to NTFS when they are using a Windows PC. As a result, when people switch to a Mac, only to find the external drive is in a read-only state.
If you own an empty NTFS drive, it will be easy to solve the problem. Just open Disk Utility and erase the disk to a Mac-friendly HFS+ or ExFAT. If you have already stored important files on the NTFS disk, things will be a little more complicated. In a situation where you just need to edit a few small Windows files, you can drag the files out to the desktop, edit them and upload them to cloud. Another way is to drag the files to the desktop, format the disk and move files back.
What if you need to use different NTFS drives often? What if the files you want to edit are too large to be loaded to cloud or moved around?
If you are one of those people who face the two questions above, installing an NTFS for Mac software will be your best option. With an NTFS for Mac app, you don’t need to worry about the file system compatibility. Using an NTFS-formatted drive on Mac will be as easy as using any other Mac-compatible disks.
iBoysoft NTFS for Mac: write to NTFS drives on macOS Big Sur
NTFS for Mac by iBoysoft is a professional NTFS writing solution. After installation, the software will mount the read-only NTFS drives in read-write mode. You can open the NTFS drives and operate all writing activities to the files such as renaming, deleting, moving, creating, or converting, tagging and sharing through AirDrop.
In addition to NTFS write support, the app also has functionalities to repair slightly corrupted NTFS disks and format non-NTFS disks to NTFS, which can’t be done in Mac’s native disk management tool, Disk Utility.
The app is upgraded to version 3.0 and is fully compatible with macOS Big Sur now. The coverage of its compatibility goes forward to macOS 10.13. The former version which can work on macOS 10.12 to OS X 10.8 is available through email request.
How to use Microsoft NTFS for Mac by iBoysoft on macOS Big Sur?
If you browse the steps below and may doubt if this app is difficult to install and use, as a matter of fact, not at all. We just break down the steps in details. Besides, Apple released new Macs with ARM-based M1 chip, third-party software installation requires extra efforts because the system security is enhanced. If you are not using a Mac with an M1 chip, installation will be a lot easier.
To use this app, you need to:
Step 1: Download it from its official website instead of Apple store.
Step 2: Load it by opening the installer.
Step 3: Click Open to allow macOS to open the installer for software installation.
Step 4: Click Open Security Preferences when a pop-up tells you that system extensions are blocked. System extensions are blocked by default after macOS Big Sur upgrade, so all software that require system extension will ask you to manually allow the software to be loaded.
Step 5: Click on Allow button in Security & Privacy window to give macOS permission to load the installer.
If you use it on a MacBook Air, MacBook Pro or Mac mini released in late 2024, you can’t allow the installer to be loaded up directly in Security & Privacy window. You will be instructed to modify security settings. The process is done in macOS recovery mode, which is a different from the traditional way to boot into macOS Recovery on an Intel-powered Mac.
- Make sure your Mac has been updated to macOS 11.0.1 or later. Check it through Apple logo and About This Mac. If not, update your Mac first.
- Turn off the computer and immediately press down power button for at least 5 seconds.
- Release the power button when you see the Apple logo.
- Select Options on screen and click Continue.
- Click on Utilities and select Startup Security Utility.
- Change the Full Security to Reduced Security and allow user management of Kernel extensions from identified developers.
- Click Ok and restart your Mac.
- Go to Security & Privacy windows to click Allow button.
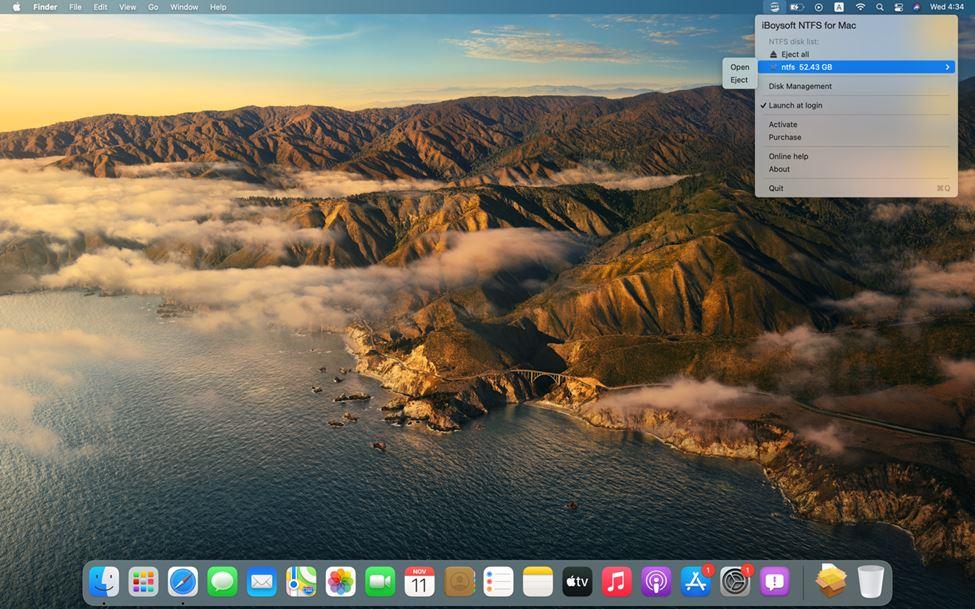
Step 6: Restart the Mac and launch the software. It will be shown up at the desktop menu bar. Preferences and Disk Management options can be accessed through the drop-down menu.
Conclusion
Apple’s annual macOS upgrade is a big event that many tool developers, tech enthusiasts and Apple fans will chase the rumors and get involved. All benefits and improvements are greatly praised, but NTFS writing support, which is a desperately wanted by Mac user, is not enabled yet. Luckily, NTFS for Mac software such iBoysoft NTFS for Mac can easily bridge this gap.
Chris Mcdonald has been the lead news writer at complete connection. His passion for helping people in all aspects of online marketing flows through in the expert industry coverage he provides. Chris is also an author of tech blog Area19delegate. He likes spending his time with family, studying martial arts and plucking fat bass guitar strings.